Enhance Your Reading Experience with Microsoft Immersive Reader in Canvas

Microsoft Immersive Reader is a powerful tool that can help students engage with written text. In this blog post, we’ll explore how to use the Immersive Reader within Canvas to read Canvas pages, and how to customize the reader’s features to enhance your reading experience.

Video Overview | View on YouTube

Step 1:

Access the Immersive Reader within Canvas To access the Immersive Reader, you need to have a Canvas page open. Once you have the page open, select the “Immersive Reader” button located in the top right corner of the page. This will launch the Immersive Reader interface, which reformats the page for easy reading and highlights individual words as it goes.

Step 2:

Customize Your Reading Experience Once you’ve accessed the Immersive Reader, you can customize your reading experience to suit your needs. You can change the voice settings to determine how fast you want the reader to read, and choose a male or female voice. You can also change the text size, font style, and color contrast themes to make the text more readable. Additionally, you can choose to highlight different components of nouns, verbs, adjectives, or adverbs within the text itself. This is particularly helpful for ESL learners and those studying complex subjects. Furthermore, you can use the align focus feature to have the reader read one sentence at a time, which is beneficial for people with cognitive disabilities.

Step 3:

Utilize Additional Features In addition to customizing the reading experience, there are other features available in the Immersive Reader that can be useful. You can select a different language to translate the content into, and there’s a built-in picture dictionary that can play words out loud or provide images of what a word means. This is helpful for people with cognitive disabilities or those who are ESL.

However, it’s important to note that the Immersive Reader has some limitations. It only works on Canvas pages and not within assignments or quizzes, and it doesn’t engage with videos, links, or third-party content. Additionally, you have to exit the reader to change pages within Canvas.

In conclusion, the Microsoft Immersive Reader within Canvas is a valuable tool that can help students engage with written text and improve their reading skills. By customizing the reading experience and utilizing additional features, students can make the most of the tool and enhance their learning.

Canvas LMS
How do I make my Canvas page accessible?

How to use the accessibility checker in Canvas

The built-in accessibility checker in Canvas allows users to run an automated check on the Canvas page. This check ensures full accessibility and should be used in conjunction with the accessibility checking methods available on this site.

Video Guide

The accessibility checker in Canvas can be a useful tool for checking color contrast, and applying table headers to content! Be sure to always manually check your Canvas page for accessibility requirements as they are easy to overlook. Keep in mind, you should apply the following items to every Canvas page:

Run the accessibility checker in Canvas

The accessibility checker will move from one object to the next in a pop-up window. Fix each issue in the checker.

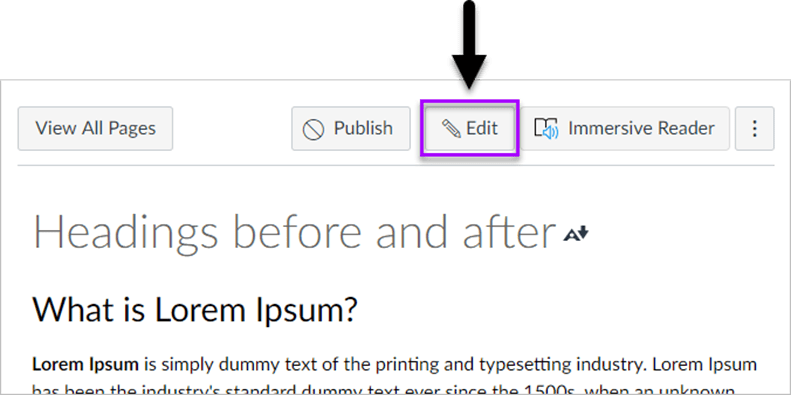
1. Ensure you are in edit mode

Ensure you are in edit mode

2. Select the Check Accessibility button in the bottom right corner

Step 2: Select the Check Accessibility button in the bottom right corner

3. Follow the on-screen steps and fix elements that appear

Be sure to next through the errors and select apply after each fix!

Step 3: Follow the on-screen steps and fix elements that appear
Canvas LMS
How do I make my Canvas page accessible?

Subscribe to The Accessibility Guy posts

* indicates required

Remember, I can be your accessibility expert. For more detailed insights, tutorials, and in-depth discussions on accessibility and related topics, don’t forget to check out my YouTube channel: The Accessibility Guy on YouTube. Subscribe for regular updates!

How do I make tables accessible in Canvas?

Making tables accessible in Canvas can be easy if you set them up correctly! Using tables for layout purposes should be avoided. Use tables for displaying data only and use Headers and Scope. This is because assistive technology uses specialized controls when in a table.

Data tables should always include table headers (the <th> element). For short tables and for tables whose data are self-explanatory, column headers are sufficient. For long tables or tables where data may be confusing, it is best to include row and column headers. <th> elements should always have a scope attribute. Column headers should include scope=”col”, and row headers should include scope=”row”. Including scope attributes allow assistive technology to better understand the logical relationships presented in the table.

Use Table Captions

Tables can be given an accessible name with the <caption> element. Screen readers allow users to view a list of tables on the page. If the table has an accessible name, a screen reader will provide that name to the user. If not, the screen reader may only read the number of rows and columns. Thus, a <caption> provides substantial usability benefits, especially if there is more than one table on the page. <caption> elements are visible to sighted users as well.

Avoid Complex Tables

We recommend avoiding tables with multiple levels of row or column headers and headers that span multiple rows or columns. Such tables may be difficult to implement with the correct markup and scope attributes, and even if implemented correctly, may be difficult for users to understand. In most cases, some other presentation of the data, including presenting multiple tables, may be an equally effective alternative to a single, complex table.

Avoid Empty Cells for Formatting

Table authors may choose to use empty cells to visually format the table, such as to indicate a division in various sections of the table. While this practice may make sense for sighted users, it may not work for blind users. We recommend avoiding blank table cells, especially when those table cells are used for formatting.

Things to consider when making tables accessible in Canvas

  • Avoid using tables for layout purposes
  • Use simple tables
  • Set table headers for both columns and rows
  • Pay attention to the scope of headers
  • Add a clear caption using the accessibility checker

Video Overview of how to make tables accessible in Canvas

Instructional Guide – How to make tables accessible in Canvas

Step 1: Ensure you are in edit mode

ensure you are in edit mode

Step 2: Select inside the cell you want to make a heading

You can set both an individual cell or an entire row as a header at once

Step 3a – Setting an entire row: Select Table button in the rich content editor > Row > Row Properties

Step 3a – Setting an entire row: Select Table button in the rich content editor > Row > Row Properties

Step 4a – Change the row type from body to header

Step 4a – Change the row type from body to header

Step 3b – Setting an individual cell as a header cell: Select Table > Cell > Cell Properties

Step 3b – Setting an individual cell as a header cell: Select Table > Cell > Cell Properties

Step 4b – Change the cell type to Header Cell and set the scope to what is appropriate

Step 4b – Change the cell type to Header Cell and set the scope to what is appropriate

Step 5: Run the accessibility checker found in the bottom right corner of the page

Step 5: Run the accessibility checker found in the bottom right corner of the page

Step 6: Add the caption through the pop-up window

Step 6: Add the caption through the pop up window
Canvas LMS
How do I make my Canvas page accessible?

Subscribe to The Accessibility Guy posts

* indicates required

How do I apply accessible hyperlinks in Canvas?

While screen readers can read a full page to a user, screen reader users may prefer to instead listen to a list of links. In that case, a screen reader may only read the link text and not the surrounding text. Accessible hyperlinks in Canvas assist with navigation.

Speech recognition software allows a user to avoid using a mouse. Users can speak the text of the link that they would like to follow.

Keyboard-only users may not be able to use a mouse to click links. They use a keyboard’s tab button to navigate through a page’s links, buttons, and form inputs. For such users, it is very important for them to see which item has a focus on at all times.

Colorblind users may not be able to perceive color cues. Typically, pages present links as a different color than their surrounding text. Adding underlines or other non-color indicators help users who may not see color. Users who are not comfortable with technology may also appreciate having links underlined.

Links should be clear and easy to understand.

The below image has two separate sites pulled up using JAWS while searching for links. The image on the left indicated the incorrect way to use links and includes link text for the full HTML URL and several wrong examples like “click here”. The image on the right represents a correct link list that uses correct link text that is descriptive and clear.

The below image has two separate sites pulled up using JAWS while searching for links. The image on the left indicated the incorrect way to use links and includes link text for the full HTML url and several wrong examples like “click here”. The image on the right represents a correct link list that uses correct link text that is descriptive and clear.

In general, content editors should avoid using images as links. If an image functions as a link, the image must have alt text that conveys the location and purpose of the link. The alt text should not describe the image. Treat image links as links, not as images.

  • Avoid link text like “Click Here,” “More,” and “Read More.” These kinds of links can be confusing when a screen reader reads them out of context.
  • Avoid using full html address: www.shawnjordison.com and instead use Check out Shawn Jordisons guide
  • Non-hypertext elements should refrain from using underlines as they can confuse sighted students who expect underlined text to be a link
  • Use judgment when linking full URLs. When linking a URL, consider users who must speak it out loud and who must listen to a screen reader announce it.

Video overview of how to apply accessible hyperlinks in Canvas

Step 1: Ensure you are in edit mode

ensure you are in edit mode
Step 2: Select the text or link you would like to edit and select link options
Canvas LMS
How do I make my Canvas page accessible?

Subscribe to The Accessibility Guy posts

* indicates required

How do I make lists in Canvas accessible?

Lists in Canvas are great from an accessibility standpoint because they provide structured order to content in a linear fashion. Lists are recommended as potential replacements for simple tables, as tables can be more difficult to navigate, and sometimes, we provide info in tables that really would be better suited to lists.

You can use lists inside of lists, or nested lists, just check to make sure they are coded properly. Lists should always be checked to make sure that the list items are really contained within one list, check to make sure that spacing does not break a list into multiple individual points, and use the proper techniques described below to create lists. You should never rely on indentation to provide a visual list, use the proper structure instead.

Bulleted lists are for lists where the order is unimportant

Items that can be used for a bulleted list are for when the order does not matter. The example I like to use is that of grocery items, here is an example:

  • Milk
  • Bread
  • Eggs

Lettered lists are primarily for unordered lists where referring to a specific item may be important. 

Numbered lists are for lists where the order is important

Use numbered lists for when order is important. Here is an example:

Directions to Store

  1. Turn left at Walnut Ave
  2. Travel for 1 mile
  3. Turn right at College Street
  4. Travel for .3 miles
  5. Turn right into parking lot

Things to consider with Lists in Canvas

  • Avoid using non rich content editor symbols like dashes or x’s to indicate a list
  • Use the proper numbered or bulleted list for the items

Video Overview of how to apply lists in Canvas

Instructional Guide – How to apply List items in Canvas

Step 1: Ensure you are in edit mode

Ensure you are in edit mode

Step 2: Select the text you would like to make a list

Step 2: Select the text you would like to make a list

Step 3: Select the type of list to apply from the rich content editor

Step 3: Select the type of list to apply from the rich content editor
Canvas LMS
How do I make my Canvas page accessible?

How do I apply headings in Canvas?

Headings are often used as the sole method for navigation for those using a screen reader or other assistive technology. It allows technology to navigate more effectively and serves as a method for jumping around text to get to the exact spot needed.

The screen reader allows you to drill down from higher heading to lower heading. This means you can list all heading level 3s under a specific heading level 2 for more precision. One suggestion is if you provide an action item in the text page, provide a heading over that, so the student can skim directly to the homework, additional reading, etc. A well-aligned page should have headings with an appropriate level of complexity:

  1. Heading Level 1 is the title of the page, placed by Canvas, you will always have this. If the page is noticeably short, less than 100 words, it can be left with no additional headings.
  2. Heading Level 2 is the highest-level separations within the canvas shell and should be used to chunk major topics in material. 
  3. Heading Level 3 and lower should be used for text-heavy pages and should be used to give additional structure to the document. 
  4. The Heading levels should form a tree, where each heading is preceded by the level one above it.

What do headings look like using JAWS?

The heading structure in the image below is clear and easy to navigate. Each heading is descriptive and is in the proper order. For those who use JAWS, they are able to navigate this content with ease.

Sample of heading structure when using JAWS

Example Canvas page with and without headings

The following image represents a canvas page that has both headings applied and not applied. Option 2 shows the correct version and clearly shows the benefits of applying headings to a page.

Sample heading structure

Things to consider with headings

  • Avoid using all capital letters, underlining, or bolding as the only means of emphasis.
  • Using a larger font or different color does not automatically indicate to a user that a page has headings. You must still mark headers using the rich content editor.
  • Headings must be in order.

Video overview on how to apply headings in Canvas

Instructional Guide – How to apply headings to a Canvas page

Step 1: Ensure you are in edit mode

Ensure you are in edit mode

Step 2: Select the text you would like to make a heading

Click and drag your mouse or click into the line

Selecting text before applying a aheading

Step 3: Choose the heading level from the drop-down menu or the format tab. Option 1 as indicated below is the easiest.

Step 3: Choose the heading level from the drop-down menu or the format tab. Option 1 as indicated below is the easiest.

Need to learn about other accessibility elements within Canvas?

Captioning and Canvas Studio

Canvas Studio makes it easy to host a captioned video for content that you or someone else has created. This guide explains just how to do it!

Captioning is an important aspect of accessibility, and captioning in Canvas studio can be a breeze. If you are using Canvas and are posting videos; they need to be captioned. This post is not going to explain why captioning is important, but rather; how do you do it in Canvas Studio.

Canvas Studio offers a unique approach to captioning videos for content that you might own or do not own. It is also a premium feature – so be sure to check with your Canvas Admin to see if it is available.

Video Overview

This video will walk you through the steps needed to host a captioned video in Canvas Studio. The watch time is 2 minutes and 5 seconds.

Steps needed to host a captioned video in Canvas Studio

The basic premise is to get an SRT file, and then upload it into Canvas studio. Once you have the video captioned, it can easily be placed on the page. This section will cover the following steps:

  1. Get an SRT file for the video you want to caption
  2. Add the video to your Canvas Studio library
  3. Upload the SRT file to the captions section within Canvas Studio
  4. Insert the Video into the Canvas page

Step 1 – You have the SRT file right?

There are many tools to get an SRT file for a video that you are trying to caption. Here is one method using Otter.ai to create an SRT file. Make sure to edit it for accuracy!

Step 2 – Get the video into Canvas Studio Library

In order to properly display a video using Canvas Studio – it must be added to your library. Here are the steps:

  1. After logging into Canvas – select the Studio button on the left column.
    The studio button in canvas
  2. Select Add in the top right corner
    adding new media to canvas studio
  3. Upload a raw video file or use a YouTube link
    Upload a raw video file or a youtube link to canvas studio

Step 3: Upload the SRT (caption file) to the video itself

  1. In Canvas studio, ensure you are in My Library
  2. Select the video you want to add a caption too
    Select the video from your library that you want to add captions too
  3. Select the caption tab
  4. Upload English captions
    Select the caption tab and upload english captions

Step 4: Place the video into a canvas page

Get into edit mode on the canvas page that you want to add your newly captioned video

  1. Select the apps button in the Rich Content Editor
  2. Select Studio
    select apps and select studio
  3. Select the video to place onto the page
    select the video you want to add

That’s it!

Are you working with documents like PowerPoint, PDFs, or Microsoft Word files? Check out some of my other posts.

Need Otter.ai?

https://otterai.sjv.io/c/3693140/1119936/13661?utm_term=Business%20Meetings&utm_medium=banner&utm_source=affiliate&utm_content=business_meeting